Saturday, 25 April 2015

App Invites For Android & iOS Apps - Facebook Friends To Mobile App

Recently I got a Notification from my Close friend in Facebook suggesting me to try a Android App.I too Eagerly clicked over that and installed from Google Play.
And the next day i was asking her how did you invite me via Facebook ? or just spammy Notification just like another Candy Crush Saga :D.Then she shown this page to me App-invites - Facebook Developers page.I was Wondering how could i invite From My App(Android) and checked out the Documentation  About the App invites and it was Quite confusing first,however after lot of Searching over Stackoverflow,reading the Documentation thrice i could build a Simple Invite System from My Android App to Invite and Suggest the App in Facebook to Engage to Download or to open the app.

App Invites For Android & iOS Apps -  Facebook Friends To Mobile App

Refernce : Download Code from GitHub 

A Drift from Web App to Mobile App : 

Once Upon a time i could remember working with implementing the invite system with Javascript with Facebook,and Now i consider this is as a Major Drift Change from web app to Mobile apps replacing it.This invite system can increase the User engagement to the user at higher levels,since you're personally inviting your friend,sweetheart :D to try those Apps.

Prerequisites : 

Here we're developing a Simple Android App that has invite button and directs to invite popup and invite our friends in facebook.
  • Android Studio With Recent SDK installed (Preferable for Dependency Adding).
  • Facebook Developer Account.
  • Register A Facebook App with Key Hash and Package Name.
  • Android Phone with facebook App Logined
  • Little patience to Debug the App via logcat.
  • A little Knowledge About Developing Android Apps and Java.
Before Writing this post,I have created a small App which made me many troubles such as App crashing,Low speed internet Connectivity(My Fate :D ) and Some Exceptions.here i will completely write my experience and exception and how i handled them.If anything apart from this let's discuss in Comments or over Email.

Creating Facebook Application - Developer console :

here we can discuss about creating Facebook App and obtaining APP ID and Secret keys for our app,and providing platform as Android,Adding key hash and package name.

  • visit here and Create new App - Link - Facebook Developers Console.
  • select the Platform As Android > and provide a Name for Your app corresponding to your android app.
  • Choose a Best category that fits your App(Most recommended by facebook to Rank your app).
  • Provide the package name to facebook and Launcher Activity too as java package name.(be cautious about package name or else it wont works :D)
  • Provide your necessary app info and move on to key hashes(will see it later how to add it)
  • At the top right of the Page click skip the Quick start and you will be redirected to App dashboard which you have created.
  • go to app > settings > provide a namespace for your app(mandatory)
  • Add contact email also and save it.
  • Now,at below add platform > select Web app and give your website address(if it available)
  • if you have website and added the platform then,Add your domain in Domain Field and Save the info.(Don't worry if you don't have any websites just skip to next step)
  • Get your APP ID and make your App live for production in status & review > toggle the button to enter in to Production mode.
  • And finally We need to Add Key hashes to our Facebook App console.(see below)

How to Generate Key Hash and Add to Developer Console :

just with your onCreate method add this code and replace with your package name correctly and run your app in Debug method(by Default it would be) and check your Logcat for the keyHash : XXXXXXXXXXXXX. Just copy it and visit your app in facebook Developer Account > Settings > in the Android Section (Which you have already created with package name) in the key Hash Field add it over and enable single-signon(may be useful for apps with login) and save the app settings.

Note : this is preferable method which i have created the key added to my Account.
@Override
public void onCreate(Bundle savedInstanceState) {
super.onCreate(savedInstanceState);

// Add code to print out the key hash
try {
PackageInfo info = getPackageManager().getPackageInfo(
"REPLACE WITH YOUR PACKAGE NAME HERE",
PackageManager.GET_SIGNATURES);
for (Signature signature : info.signatures) {
MessageDigest md = MessageDigest.getInstance("SHA");
md
.update(signature.toByteArray());
Log.d("KeyHash:", Base64.encodeToString(md.digest(), Base64.DEFAULT));
}
} catch (NameNotFoundException e) {

} catch (NoSuchAlgorithmException e) {

}

Android Studio Project and Facebook SDK Setup :

I just love Android Studio mainly because it automatically adds the dependency with one line in app gradle.However i'm not expert in Working of Gradle system! however i know how to use it projects to add dependency without any pain unlike Eclipse you have to Add it and point the locations and export while you're building it finally.
  • Open You Android Studio(i hope you have installed latest SDK and tools installed).
  • create new project with a Empty Blank Activity.
Now just open your app gradle file and add the entries to resolve the dependencies via maven repository.

dependencies {
compile fileTree(dir: 'libs', include: ['*.jar'])
compile 'com.facebook.android:facebook-android-sdk:4.0.0'
}
 and just sync your gradle or rebuild your project.

Note : Mainly this Dependency support from API 9 and above.just change minSDK as 9 and higher till Android API 22 or L (your choice).

Adding the Code : 

lets just first see about setting permissions and adding entries in Manifest file regarding Facebook SDK setup.
  • I have added a default activity to be launched and shown in launcher.
  • then added facebook activity (may be useful for apps used for login/share with facebook)
  • added meta-data content containing facebook app id as string from xml file.
    don't just hardcode your APP ID, it may create exceptions,it is recommended by facebook to use as String from xml string.
  • Finally add Permission for internet appropriately since we are doing network based operation in our app and facebook needs it. 
        

<uses-permission android:name="android.permission.INTERNET" />
<application ...>
<activity
android:name=".facebook"
android:icon="@mipmap/ic_launcher"
android:label="@string/title_activity_facebook" >

<intent-filter>
<action android:name="android.intent.action.MAIN" />

<category android:name="android.intent.category.LAUNCHER" />
<action android:name="android.intent.action.VIEW" />
<category android:name="android.intent.category.DEFAULT" />
<category android:name="android.intent.category.BROWSABLE" />

</intent-filter>


</activity>
<activity android:name="com.facebook.FacebookActivity"
android:configChanges=
"keyboard|keyboardHidden|screenLayout|screenSize|orientation"
android:theme="@android:style/Theme.Translucent.NoTitleBar"
android:label="@string/app_name" />

<meta-data android:name="com.facebook.sdk.ApplicationId"
android:value="@string/facebook_app_id"/>
</application>

So just use this example to add your manifest file,and check that you have added facebook activity in your manifest file too.

MainActivity - Activity to initiate App invites :

Here we are initializing the App with facebook library and set the view as XML layout and then simply add a link and preview image preferably a large image is recommended.
get your App links from facebook to launch the activity from facebook or web or some other apps.learn more about app links here in my previous article.
create App link from here. 
  • select the created facebook app for android
  • Select android platform and scroll down
  • in the Android section , Add your package name for launching the app if it is present in the particular device or else just as fallback it may be moving into playstore.
  • Enter your playstore package name(must be equivalent to your android app project package name)
  • If you have website just add it,check that you have app links in the head section of the website and the domain should be already added in the App> settings > domain(when web platform is enabled )
  • Create a new Applink and just copy it.
Just replace with your app link in the code given below,and chenge your imageurl too(must be high resolution image).
 
@Override
protected void onCreate(Bundle savedInstanceState) {
super.onCreate(savedInstanceState);

FacebookSdk.sdkInitialize(getApplicationContext());

setContentView(R.layout.activity_facebook);

String appLinkUrl, previewImageUrl;

appLinkUrl = "https://fb.me/493857950766025";
previewImageUrl = "https://blogger.googleusercontent.com/img/b/R29vZ2xl/AVvXsEhFlJx_QbYwpbLkqo-tZkSl4waIjKo5IUbe0eM32WgGCX-poInzLWegKE9-0mGdUi5faoK3NCt4rjGYzZu4LObVeCOJZubSnRem1FdxqAKHwGWuDAqmb2Kglv9i3vzi_Pfx7csGgCnOvBlr/s1600/appscripts.png";

AppInviteContent content = new AppInviteContent.Builder()
.setApplinkUrl(appLinkUrl)
.setPreviewImageUrl(previewImageUrl)
.build();
AppInviteDialog.show(this, content);

}
Thus while Opening your app this will default invoke to app invite activity of facebook.
Here facebook verifies the user has installed however latest facebook app in device or else as fallback it opens as webview facebook.You must be logined in the facebook Native app or Webview already will be fine for testing.

Main Note:

This Invite Feature doesnt need any Login With Facebook Feature,This just Simply enables you to invite your friends when you're logined with facebook app.

Errors which i came across:

  • null pointer Exception for not Adding Facebook App ID in manifest file.
  • null pointer Exception for Hardcoding the APP ID in manifest File.
  • Facebook App canvas Error for not adding key hash mismatch.
  • Facebook App canvas Error for App in development mode(switch to Production mode)
  • Null pointer Exception for not initializing Facebook SDK before setcontentView method.
However if you didnt find any error if you come across,comment below lets discuss it and resolve and make this post more usable.

My Screenshot : 


For hugs/bugs/errors/help/suggestions just comment below or mail me to s.shivasurya@gmail.com or chat with me in Facebook/G+ or tweet me in twitter.Share is care.

Friday, 20 March 2015

Getting Started With Google App Scripts - Send Email From Google Spreadsheets

In This Modern World it would be better to have triggers to do our works automatically with less input feed and make more automated manner.and Recently,This was running in my head and concurrently i'm one of the member of Google Student club in my College and we were about to conduct a small workshop and one of the member took in-charge of getting online forms filled and select 30 students and sending them a confirmation mail to them and instruction.and it was successfully implemented in native hand written scripts in PHP and MYSQL.And there comes my idea of using Google App Scripts with Triggers in Action to Automate our Selection panel and E-mail Sending to who have registered.and suddenly gone through DOCS and tried with my mail and was sending mails in minutes from spreadsheet and thought of sharing it my followers,and recently i got request to write Google Apps scripts tutorial.

This is just Kick Start for Google App Scripts @ +i-visionblog !You can expect more business and Productivity based app scripts soon in our blog or personally contact me in mail for Other Apps Scripts for Business and Productivity.


Reference : Demo | Download Script

Motive :

Our Goal in this post is to send Email to the peoples who have submitted the form or recorded response and as well as Admin.The mail will be delivered from your mail inbox to the client through Gmail API.

Prerequisites :

  • A Google Account with Google Drive Enabled.
  • A Little knowledge in JavaScript to handle Arrays and functions.
  • Google Forms and Spreadsheet.
And little patient to test and Debug the code and check the log for error handling! 

Procedure :

Setup up A Basic Form with Google Forms.
    • Open the link create Simple Form with Name and Email as TEXT attribute and make it as mandatory by ticking required.
    • Then publish the form public and test whether it is working and accepting the form submission over public.
select Script Editor
Setting up Basic Script for sending the Mail with Script editor in Spreadsheet :
  • Go to the corresponding the Response Form Spreadsheet and open and view in Browser.
  • under Tools > Script Editor select it and will open the new tab with Google scripts page.
  • create new blank Project in Google App Script Editor.
  • And then with default code.gs file will be prompting you to type the code.
  • So,it's time now to write down the code for Responding the user with the mail who submitted the form with our function written in Google App Script Editor.

 Code : 

 function onFormSubmit(e) {

  var timestamp = e.values[0];
  var mailaddress = e.values[2];
  var body = e.values[1];
  MailApp.sendEmail(mailaddress,"TEST MAIL",body);

  }


The Above Code is self explanatory one ! however you could get the the response from the e variable as array e.values and with MailApp.sendEmail function you could send the email by passing the parameters as mail address ,Subject and body.note that always the first array value will be timestamp of submission and next will be your form values in according your arrangement in Google Form.

Steps to Execute :

Follow the steps correctly to test and execute the script.

select current project trigger

  • Click Current Trigger Project in Google App Script page Toolbar.
  • You will be listed with Triggers with corresponding functions written in code.gs,it must be mapped with corresponding events like spreadsheet on view,edit,update and adding entries and form submissions.
  • set up trigger 

    • Click on Notification > and change it to immediately for crash Reports 
    change to immediately to check your errors

    • Click Okay and in main Project Trigger confirm your identity by accepting the OAuth from google for delivering the mails on your behalf and with your name.
    • Now view the live form and test it in your browser and if all goes well just you will be getting mail who submitted the form with correct mail id.
    • If you need admin Email also just copy the same function and replace with your email hardcoded so that you may also get mail whenever the form is submitted.
    • If something you(Admin) will receive the script Failure Exception details via Email update immediately since we set immediately in our notification of current project triggers.

    My Result on Testing the Google Form :

    Test Mail successfully Received

    thus have a live Demo from above given link in reference section and download the code and try yourself.Always validate the input from the client! side for improving the security.

    Note: This post deals with the basic of Google App Script usage.You can do a lot with Google App Scripts almost you can Automate all your activities.Let us see about it in future post.subscribe our blog for updates and recent posts.

    For Bugs/Hugs/comments/doubts/updates and projects just drop mail to s.shivasurya@gmail.com or chat with me in Facebook/Google+ chat and for updates and interesting tweets/updates follow me in Twitter.
    Share is care.Feel free to comment

    Saturday, 21 February 2015

    App Indexing API For Google Search - Mobile Application Development

    Mobile Computing and Mobile Application Development is the Future,made me to think that Mobile apps and computing,optimization is going to be the next big thing on Earth.As i have experienced Android development as well As Web Development i could correlate the things like Google Search, Mobile Views and so on.As every one knew Mobile apps search are comparatively different from Desktop search,Where we could directly visit the Websites and make purchase and move on.But, in the case of Mobile it is going to be however hurting experience for both users and Developers to maintain and interact with Webview in Smartphones.So,Google came up with Solution to show and index apps on Google search on Signed in Browser for Android and show relevant apps that can be view with Mobile apps.

    So,if it is site we could submit the sitemaps to Google Bots and Crawl our contents for indexing,but in case of apps... so,here comes Indexing API to index your app contents and correlate the contents with web and mobile and Show suggestions on Google Mobile Search app.


    Prerequisites :  

       Download : Code at GitHub 

    We are just going to Create some content in app and try to show in Google Suggestion using Relevant Keywords.We will deal without web url in this post.
    • Android Phone with Play Account
    • Android Studio (Preferable because of Gradles )
    • Some Patience :D and Simple App to test it out.

    Procedure :

    As i don't write android app tuts here,Just Start Creating Simple App with main activity with some contents and title with relevant key title.You can refer the Source code from my Github Repo.There are two ways of App indexing as i have categorized with Web URL and Without Web URL.
    • With Web URL we could index the content of the app in Google Mobile Browser Search by showing your App and which will lead to open the App from native browser.
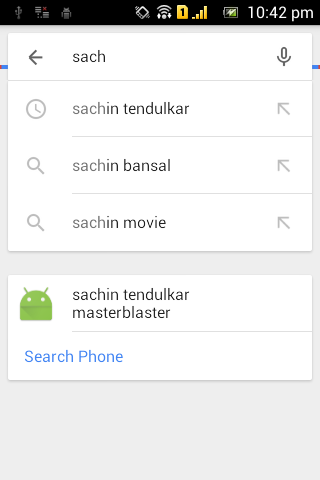
    • Without Web URL we could index the content of the app in Google Search Suggestion in Google Search App which leads to open the content of the apps.(BTW the search result display is not mentioned as far as i have read). 

    Configure Your APP :

    Just we have to configure your app manifest to accept the intents and make way to launch your app by other apps and receive data.Important thing in app indexing is having correct App URI and Keywords.Your app uri must be kind of,

    android-app://com.example.app/<scheme>/<host>

    However you can use your own custom scheme,Follow the given code below for example,


           <meta-data android:name="com.google.android.gms.version" android:value="@integer/google_play_services_version" />
            <activity
                android:name=".MainActivity"
                android:label="@string/app_name" >
                <intent-filter>

                    <action android:name="android.intent.action.VIEW" />
                    <category android:name="android.intent.category.DEFAULT" />
                    <category android:name="android.intent.category.BROWSABLE" />

                    <data android:scheme="cricket"
                        android:pathPrefix="/sachin" />

                </intent-filter>
            </activity>

    Test your app using adb command :

    adb shell am start -a android.intent.action.VIEW -d "cricket://sachin" com.ivb.app.app_indexing
    This must start the activity successfully without the errors! check out the code for manifest here.

    Without Web URL : 

    First of all let us assume that we have website with content and displaying in Google search results and we need to link that with our Android app.

    There are two steps to set up this App indexing API :
    1. First implement the API in the Android application with few lines of code,Check out the simple Activity title to be indexed here.

    Setting up Google API client :


    public class MainActivity extends ActionBarActivity {
        GoogleApiClient mClient;

        @Override
        protected void onCreate(Bundle savedInstanceState) {
            super.onCreate(savedInstanceState);
            setContentView(R.layout.activity_main);
        mClient = new       GoogleApiClient.Builder(this).addApi(AppIndex.APP_INDEX_API).build();


    using onStart method make your API call after loading your UI generally,make your web URL as null,since we don't deal with the with Web indexing now.we will deal with with web url in next post.


    public void onStart(){
            super.onStart();

                mClient.connect();

                final String TITLE = "sachin tendulkar masterblaster";
                final Uri APP_URI = 
      Uri.parse("android-app://app.ivb.com.app_indexing/cricket/sachin");

                final Uri WEB_URL = null;

                PendingResult<Status> result = AppIndex.AppIndexApi.view(mClient, this,
                        APP_URI, TITLE, WEB_URL, null);

                result.setResultCallback(new ResultCallback<Status>() {
                    @Override
                    public void onResult(Status status) {
                        if (status.isSuccess()) {
                            Log.d("success", "App Indexing API: Recorded recipe view successfully.");
                        } else {
                            Log.e("error", "App Indexing API: There was an error"
                                    + status.toString());
                        }
                    }
                });

        }

    Using onStop() method and disconnect the Client of GoogleAPI service


    public void onStop(){
            super.onStop();

                final Uri APP_URI = 
    Uri.parse("android-app://app.ivb.com.app_indexing/crciket/sachin");

                PendingResult<Status> result = AppIndex.AppIndexApi.viewEnd(mClient, this, APP_URI);

                result.setResultCallback(new ResultCallback<Status>() {
                    @Override
                    public void onResult(Status status) {
                        if (status.isSuccess()) {
                            Log.d("success", "App Indexing API: Recorded recipeview end successfully.");
                        } else {
                            Log.e("error", "App Indexing API: There was an error"
                                    + status.toString());
                        }
                    }
                });

                mClient.disconnect();


        }


    Use this API calls wherever you want and you can make it dynamic for same activity by passing relevant uri and keywords.And main important thing here is giving Relevant Keywords for your Activity and content to be indexed in Google search and suggestion.

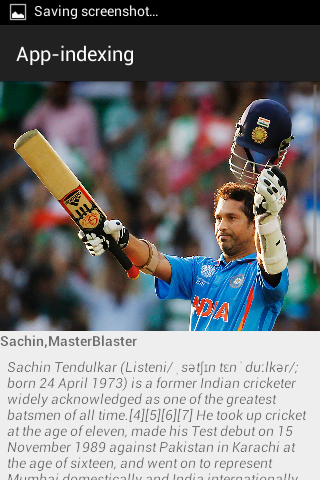
    Note: After implementing this you can check your Google Search using Google Now/Search app Showing suggestion when you search relevant to your keywords.

    My Results : Code hosted on GitHub


    Well we had seen how to index our app content with keywords and APP-URI through APP-INDEXING API.However before implementing this API,Just test it the App-uri using adb tool and check whether it is resolved successfully and opening your app.

    Lets implement with WEB url in next post with live App with search result indexing

    For Suggestions/Help/hug/bug or projects just drop me a mail to s.shivasurya@gmail.com or chat with me in Facebook/Google+ hangout or connect with me in Twitter for recent updates.Share is care and sign up for newsletter for recent updates in blog.

    Monday, 19 January 2015

    Developing iOS apps and Test with Ionic View For iOS - Apps Development

    i'm Big Fan of Ionic Framework and services,Eagerly waiting for ionic Creator GUI interface to develop cross platform apps.Ionic Framework becomes powerful Day to Day and web developers prefer to use it because Cross Platform Supported and good and Responsive User interface unless like JQuery Mobile and Powerful Angular Javascript for Application Logic and Controller.I love to Work with the this framework due to rich UI like bootstrap.Recently They have launched the iOS ionic view to Lively test your apps on ios via ionic Cloud service.Develop your apps wherever ! upload with single command and Download it and use it within the ionic view iOS app.This is Similar idea as like intel app framework to deploy on real device on Android.However since i don't have any MAC Device for Developing ios apps,this helped me to deploy it on original device and test it.


    Prerequisites :

    1) Learn Here to Install and Work with Ionic apps CLI and to Deploy.
    2) Create Account at ionic apps service. 

    Now let us create a Simple Ionic App to work it out in iOS through ionic view.

    Procedure :

    Open your command prompt and start typing command mentioned below,

    > ionic create <app name > blank

    This Above command will create Simple Template app with Hello world.

    Now just start creating the App from Scratch with HTML/JS/CSS may be cordova plugins for API Access.After just we have to upload the Project files to the ionic service.

    >ionic upload

    At the First moment it will prompt for Email and Password,Just give away the credentials and you application will be uploaded with success message.

    Caution : I had Recently updated Ionic , Cordova npm packages in my System,So.i didn't get any Error messages,So please Check your version and work it out.

    Confused State : 

    We didn't even add iOS as platform then how could we run it on iOS device,Actually i too had this Starnge :D funny idea but the whole fact is simple,we are uploading the HTML/JS/CSS files and running it in webview of iOS app.so when your deploying standalone app then you should add iOS platform to build the app and release.

    Work with your app on iOS :

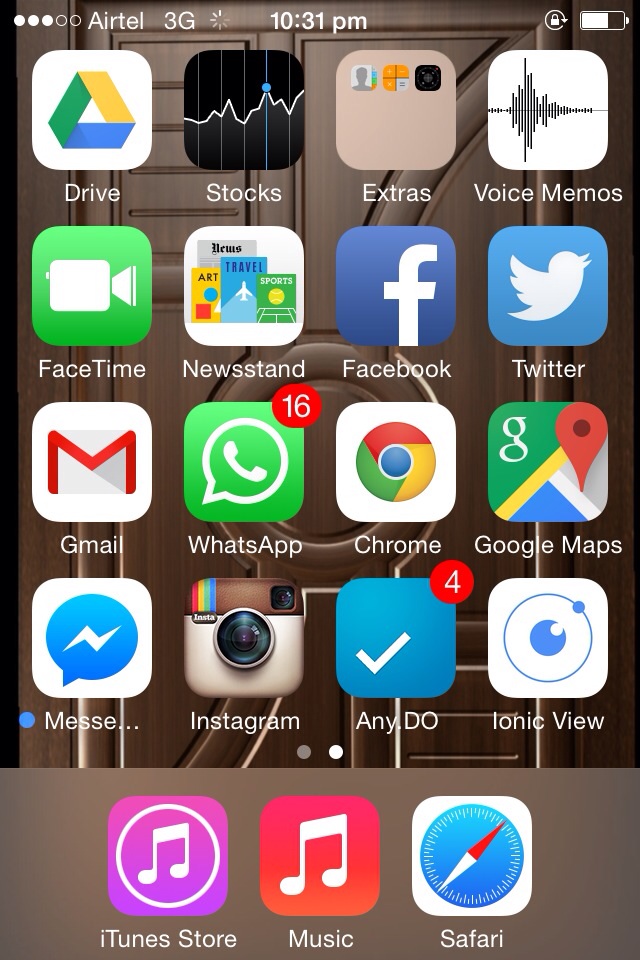
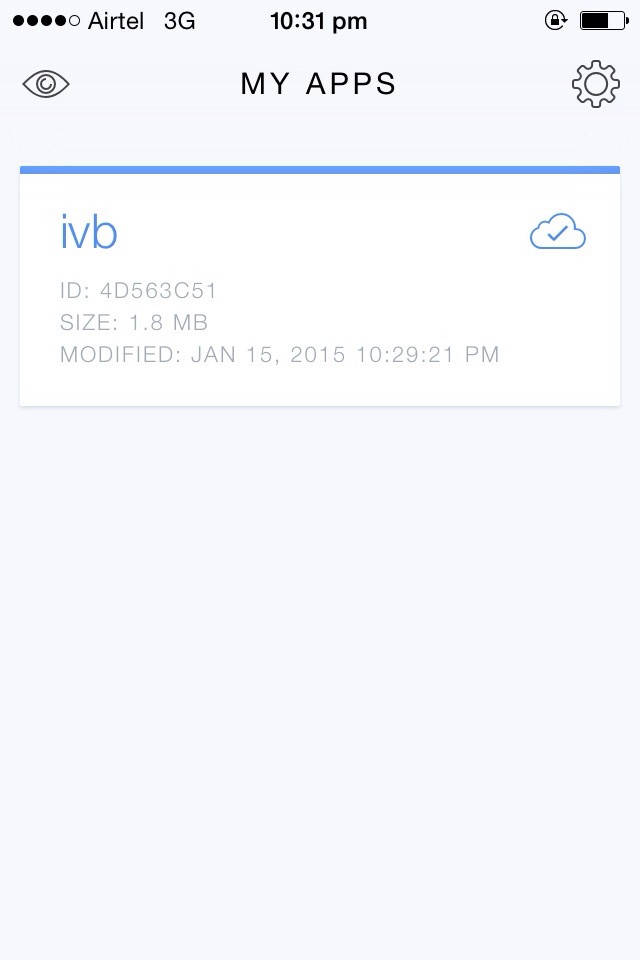
    Download the ionic view app from your iTunes Store.Login with your ionic app service credentials and your app will listed in the app.Just click to deploy within the Webview of that app to test it out.That's it.

    My Experience : 

    Recently i was working with +Mothi Venkatesh for apps development for Blogging platforms,We just Tested it with our Blog simple RSS feeds.


    Thus We have Successfully Tested our app in iOS Device,but it may have numerous limitation i hope in future for advanced users and developers.

    For bugs/Errors/Comments/Hugs just comment below using Disqus or mail me to s.shivasurya@gmail.com or connect with me in Facebook/twitter/G+ hangout chats for Discussions and Help.Share is care.


    Sunday, 11 January 2015

    Socket.io Twitter Streaming API - Node.js Deployed on Modulus.io

    We Would be curious About Chat Applications Response on time and blaming it if makes struggle a lot to connect with servers and message keeps on Failing with lot of Notification that "Message Failed".Many Of my Friends have faced that and Trolled the Application.And here comes the Technology known As Sockets/AJAX polling to instantly chat with our Besties/Crush :D .However we could use the Socket/Ajax Long polling Technology for Streaming Videos,Files and Tweets from Twitter for Web/Mobile and Desktop Apps too and for Real time Updates.it can be also used for Collaborative works over online to maintain concurrency among the group members and real time!


    Reference : Download | Live Demo

    Ultimate Goal :

    After Working/Reading this Post you can technically create and set up Node.js with Socket.io Server side and connect with Clients and Stream Media/Text Whatever may be!

    Prerequisite : 

    1) Twitter Account with Verified by Mobile Number(This is mandatory to create apps on Dev.twitter)
    4) Node.js npm Commands /basics 

    Procedure :

    Create a Twitter App :
    • Start Creating Twitter App - Link [ Callback not Required ]
    • Copy Consumer Key / Consumer Secret

      Setting Up Server : 

    Node.js Server Setup with Socket.io and Writing functions for events that Emit.Generally Node.js Event Driven Programming Language which has infinite loops to execute in single threaded.So just we are going to write some Routines for Functions which mean that they must Execute when corresponding event occurs.

     > npm install -g socket.io

    >  npm install -g express

    package.json :


     {
    "name":"tweets",
    "description":"Simple Streaming Twitter",
    "version":"0.0.1",
    "dependencies":
    {
    "express":"4.x.x",
    "twit":"*",
    "socket.io":"*"
    }
     }


    Install the package as per directed in package.json file.Additionally i have included twit which is also library acts for Twitter API.

    server.js :


    var express = require('express')
      , app = express()
      , http = require('http')
      , server = http.createServer(app)
      ,Twit = require('twit')
      , io = require('socket.io').listen(server);

       server.listen(8080);


      app.use(express.static(__dirname + '/public'));


     app.get('/', function (req, res) {

          res.sendFile(__dirname + '/index.html');
    });

    var target = ['cricket'];

     var api = new Twit({
        consumer_key:         'YYYYYYYYY'
      , consumer_secret:      'YYYYYYYYY'
      , access_token:         'YYYYYYYYYY'
      , access_token_secret:  'YYYYYYYYYY'
    })

    io.sockets.on('connection', function (socket) {


     var stream = api.stream('statuses/filter', { track: target })


      stream.on('tweet', function (tweet) {

        console.log(tweet);
        io.sockets.emit('stream',tweet);

      });

     });


    The above code contains the twit,Http and Express and then we written function to be triggered when connection to client is successfully established.here we are giving our required consumer key,Consumer Secret ,Access Token and Access Token Secret.with that we have added the streaming Watch list and then made API call to Twitter to get the Right Status and we are Emitting the Tweet as Data to our connected Clients via Sockets/Ajax Long Polling Approach.

    Read here about How Does Socket.io Works / Does Socket.io uses Websockets ?

    Client Setup :

    The Basic Rule is simple Javascript event is triggered to connect to the server and Long Polling is done on Server to ensure they are connected and either Data gets Transmitted/Received using the Events by Javascript Socket.io.


    A simple Client Example : 


    <script src="/socket.io/socket.io.js"></script>
       <script src="https://ajax.googleapis.com/ajax/libs/jquery/1.7.2/jquery.js"></script>
      <script>
            var socket = io.connect(); 
            socket.on('stream', function(tweet){
              $("#data").append(tweet.text);
           });
    </script>


    Resultant :


    Final Word :

    Thus We had Successfully created a simple Streaming from Twitter Real Time Updates with Node.js and Socket.io.If you're Downloading the Code replace the Keys and Work it out in Localhost and test the Streaming API from twitter.However this is the basic part of Socket.io.you could perform a lot when you go through the Documentation from Twitter!.

    We will see how to Deploy Socket chat apps/Real time Data Sharing apps on Cloud in Next post.

    hope you have Enjoyed!For bugs/comments/hugs/report/issue/help just drop me a mail s.shivasurya@gmail.com.or connect with me in Facebook/Twitter or Chat with me In G+.share is care.

    Monday, 5 January 2015

    Introduction To Internet Of Things - IOT with Frugal Labs at IIT Madras

    By last Decade the Internet came up with boom of several technology with popular Programming languages to run at server side and and delivering the clients machine.And by 2007 came up with Mobile Phones with Internet Access and by now it has matured and grown a lot.by the same side Internet usage is also growing and device connected to the internet is also growing heavily.So,some interesting thing came up know as Internet Of Things.Even many more popular company starts supporting it because it's scope in future is really needed when you deeply apply the science and Facts.


    I had attended Workshop Recently on Internet Of Things at +IIT Madras with my CollegeMates +SRIRAMAMOORTHY, +Puviyarasu , +venkatraman,RamKumar, +sivasakthi,naveen,Senthil.Really it was Awesome to Work with them on IOT hands on Session by Frugal Labs!


    So,What is Internet Of Things ?

    Internet Of Things is Nothing but simple technique which Machine-Machine Interaction and Decisions,Predictions made by machines programmed and Sensed by sensors and Assisting the Humans Digitally for Day to Day life.

    A Fast Video on Internet Of Things :


    Some Day to Day IOT Ideas :

    IOT comes here to help you to Take Selfie with no Pain :p to monitor the Traffic in a Area and Notify you!Assume you have to take tablets in right time,IOT helps to notify and monitor you assisting digitally.It can Track,Sense and interconnect many Device and Share data and Respond to the Particular Situations.here is Small Video on Real Life Application on Internet Of Things in Day to Day Life!


    My Experience @ IIT Madras with Frugal Labs :

    We Got small arduino UNO board for Working out and connecting with Cloud and Mobile apps.We have Actually followed Python programming Language to Connect With IOT device and pushing data in to Cloud and KiWi App module from Python for Desktop Apps development and Simple Android App to control Device Via Bluetooth low Energy Device Module.My Small Snaps On Workshop Below!


    Arduino Board Connected With USB
    A Simple Program to Control LED and Check Temperature using Sensor
    Bluetooth Module to communicate between Device and Arduino board


    Hello World App :

    When We try New Thing we Always perform Hello World ! :D and we too done it successfully using arduino board and some LED lights on Board! 

    Temperature Sensor App :

    Then Comes Temperature Sensor module where we just coded for getting Room Temperature and Display in our Console.and We took the Data to Parse Cloud with the Help of Parse API and python Coding.

    Bluetooth Communication App:

    Finally we connected Remotely with Bluetooth to fetch Data from The arduino Board and Displaying in Either Computer Console/Android App console.

    Final Word:

    And The Above is just Beginner Level of IOT with Arduino programming and supported by INTEL and even more popular companies.hope you have got some Ideas about Internet Of Things Rite now.Visit the Frugal Labs site for more Workshop details and Assistance details.


    for more suggestions/Bugs/Hugs/help just mail me to s.shivasurya@gmail.com or start commenting below or chat with me in Facebook/G+ chat.share is care.