Showing posts with label php tutorials. Show all posts

Wednesday, 3 September 2014

Login With Yahoo PHP API - OAuth2 Authentication

Yahoo is one of the network giant.I remember now once upon a time when i was learning class 3rd  (2004) I have accessed Yahoo home page from my school internet and and many websites too.btw i Dont know that was internet and Web browser . and This is just a simple post for login with yahoo API for fetching users detail for our web application and authentication.This is basic for fetching users data such as Contacts/Basic Profile and used for posting status and whatever API.We could use general API too. such as Whether forecast,Business Stocks,news headlines.however this is old API familiar to every one,I'm gonna add this and integrate with invite by email script with Google!


Resource : Download | Demo 

Installation : 

Yahoo provides a Library for their Oauth service with many inbuilt functions such as checking session and fetching users data.I have Included it in Demo File.use the Resource.


  • First of all create a developer account and login Yahoo.click here to create. 
  • Create New Application[project] for Web Oauth2 Authentication and Fetching Users Data


register your app

  • In Scope choose private data -> contacts and ur preferred options for your application


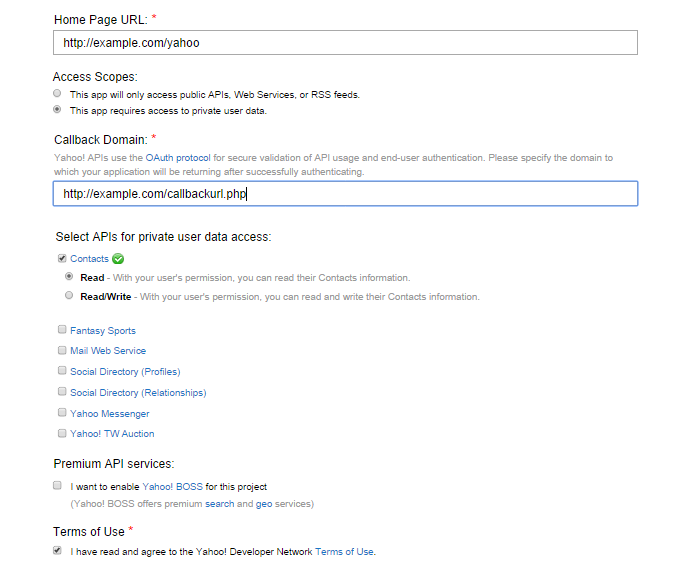
Choose private data -> contacts -> preferred read or write
  • After Final Step is to verify your Domain by uploading a file to root of the website.
  • Get your Application ID, Consumer Key,Consumer Secret and Note your Domain is verified
    and you can add details about your app in Detail section too.
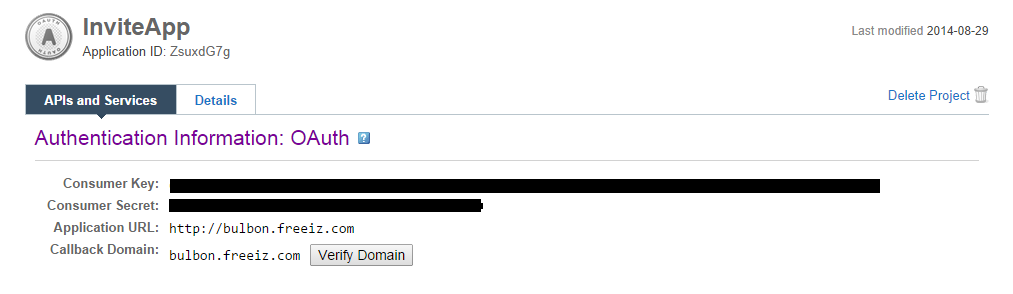
final app registered


Configuration :

Under index.php just we are adding our Application details and defining ,They are used to authenticate your application and provide you the user data.
define('OAUTH_CONSUMER_KEY', 'ZZZZZZZZAAAAA');
define('OAUTH_CONSUMER_SECRET', 'AAAAAAAAA');
define('OAUTH_DOMAIN', 'mydomain.com');
define('OAUTH_APP_ID', 'APP_ID');

Authenticate The User :

Include the Yahoo library and lets make authenticate URL,we just need to pass a callback URL alone which can be defined ourself.And to maintain the Authentication flow A Javascript is introduced for User convenience , A popup for authentication and loading the page once again for API calls and fetching user data.So , We have user in_popup in our Callback url to know that the user has authenticated and to reload the page

YahooSession is a predefined class with member function to create authurl for our application by passing our key,secret and callback url

  $callback = "http://bulbon.freeiz.com/shivasurya/invite/yahoo/sample/sampleapp.php?in_popup";

  // this URL will be used for the pop-up.

  $auth_url = YahooSession::createAuthorizationUrl(OAUTH_CONSUMER_KEY, OAUTH_CONSUMER_SECRET, $callback);


place the $auth_url in the form of Login with Yahoo link button.

Checking for Session : 

There are two type of function to easily manage session in our application.
  1. hasSession method is used to check the web app has previous any session and this is used to determine to login once again with a popup.
  2. requireSession method is to generate a session for us/fetch session existing one and our session data consist of the profile of the user.

$hasSession = YahooSession::hasSession(OAUTH_CONSUMER_KEY, OAUTH_CONSUMER_SECRET, OAUTH_APP_ID);

$session_new = YahooSession::requireSession(OAUTH_CONSUMER_KEY, OAUTH_CONSUMER_SECRET, OAUTH_APP_ID);

Loading user Data and Displaying Details :

So,by using the above methods we could check the existing session or request to create new session and we could load the user profile data in our web application.


if($session_check) {
    $user = $session->getSessionedUser();
  // Load the profile for the current user.
    $profile = $user->getProfile();
  }
try to var_dump the $profile array to see whole data of User who logined in to web application.For full code download and have a try in your Domain.i am leaving in your part for exception handling and checking sessions and showing login button to the users in your application.

Note : For using Yahoo API , Your domain must be verified[file upload in root directory] and above code runs in popup for authentication purpose ,enable your popups!


For Errors/comments/bugs and suggestions use comments or contact me s.shivasurya@gmail.com or connect with me via Facebook/Twitter.Share is care.

Tuesday, 8 July 2014

Working With Google URL Shortener Service API and Create,Track,Maintain Analytics with Google Account - Javascript API


URL shorteners are really useful for stats counting ,providing small sized URL instead of a huge links.Many Business on Internet Social Media needs stats on how many peoples clicked and used the url.However there are lot of service such as +Klout , +Buffer  and so many sites have their own url shorteners and make stats for users and business organiztions based on data clicks,reactions from Popular social networks.So,Creating and maintaining Shortened URL with Performance and scalability is important,Thats why Google gives us API platform where we could Read,Create,Analyse the Shortened URL by them.we are Just using the service provided by Google in rightful way by providing access Tokens , Login.


Working With Google URL Shortener Service API and Create,Track,Maintain Analytics with Google Account - Javascript API
google URL shortner API service
Files   :  Download   |  Live Demo 

Scope : 

I have Written a simple Web application that connect with your Google account and Can fetch Your all Shortened URLs,Analytics and create new URL and shorten them within an instance.

Sponsored :


Installation and Requirements : 

First of All Log into your Google Developer Console for registering our API service and to get API KEY and for Oauth Login. Click here


  • Create a Project and move inside [*note :  I haven't enable Billing for using Cloud or API Service-be cautious while using those service]


  • Under APIs And Auth select API -> enable URL SHORTENER API  alone is enough.


  • Then Move to Credentials Tab.Create API public Key with suitable requirements.select Browser key.


  • API KEY set up
    Then Move To Create Client ID : 
    Application type : Web Application with Authorized javascript Domain Origins and Redirect URL.I have given Both as same Since it is Single page web app under index.php in my localhost
    Get your Corresponding API key from Public API and CLIENT ID for our Web application.

    we need two Scripts from google namely client.js and jquery for easy handling.


     <script src="https://apis.google.com/js/client.js"></script>
     <script src="https://ajax.googleapis.com/ajax/libs/jquery/1.8.2/jquery.min.js"></script>


    Initialize App with Login and Fetching Access Token :
          Juts use Client ID here and Load with gapi.auth.authorize( ) function to authorize our application with an Google account.


      var apiKey = "API _ KEY here";
     var clientId =  "CLIENT _ KEY _ HERE ";
       var scopes ="https://www.googleapis.com/auth/urlshortener";


    Authorize function :

    gapi.auth.authorize   - method just takes client id and scope for authenticating user and provides you access token with gapi.auth.gettoken()


      function auth() {
            var config = {
              'client_id': clientId,
              'scope': scopes
            };
            gapi.auth.authorize(config, function(data) {
              console.log('login complete');
              console.log(gapi.auth.getToken());
             if(data.access_token)
             { $("#login").hide();
                    $("#call").show();
              }
           });
          }


    Create A New Shortened URL : 

    Generally client.load is used initialize with three params namely : scope ,version ,and a call back function to execute.This is the general approach to call API and bring data inside your application for any type of API data pulling,updating service.
    gapi.client.urlshortener.url.insert - is the main function which request the server API for result data and operation.this function just passes the Long url parameter to create shortened URL in return as JSON object.
      
           function load() {
             gapi.client.setApiKey(apiKey);
             gapi.client.load('urlshortener', 'v1', create);
    }
        function create() {
        var url = $("#url").val();
      var request = gapi.client.urlshortener.url.insert({
        'resource': {'longUrl': url }
      });
      request.execute(function(response) {
             // success do something here with responded data
             console.log(response.id);
       });
    }


    Retrieveing Long URL by inputing Short URL : 

    By the same above method gapi.client.urlshortener.url.get is responsible for fetching the relative long URL.
      
           function loadforretrieve() {
             gapi.client.setApiKey(apiKey);
             gapi.client.load('urlshortener', 'v1',read);
    }
        function read() {
         var url = $("#url").val();
      var request = gapi.client.urlshortener.url.get({
        'resource': {'shortUrl': url }
      });
      request.execute(function(response) {
             // success do something here with responded data
             console.log(response);
        });
    }


    Retrieving USER ACCOUNT shortened URL and Analytics :

    Similarly By the two Methods  gapi.client.urlshortener.url.list( ); will list you all URL already shortened by particular logined user.
     gapi.client.urlshortener.url.list({"projection" : "FULL"}); will list you with analytics ,clicks with month,days basis have a look at the response on console after performing the action.
      
           function loadforuser() {
             gapi.client.setApiKey(apiKey);
             gapi.client.load('urlshortener', 'v1',userapi);
    }
        function userapi() {
         var url = $("#url").val();
      var request = gapi.client.urlshortener.url.list);
      request.execute(function(response) {
             // success do something here with responded data
             console.log(response);
        });
    }


    You can achieve this function calls simply by button inputs onclick events and you should do with logic since you have jquery for hiding login button after authentication and displaying input box to create.

    If you have any doubt just ask in comments/mail me s.shivasurya@gmail.com.if you can find any bugs comment below.Share is care.

    Working With Google URL Shortener Service API and Create,Track,Maintain Analytics with Google Account - Javascript API


    URL shorteners are really useful for stats counting ,providing small sized URL instead of a huge links.Many Business on Internet Social Media needs stats on how many peoples clicked and used the url.However there are lot of service such as +Klout , +Buffer  and so many sites have their own url shorteners and make stats for users and business organiztions based on data clicks,reactions from Popular social networks.So,Creating and maintaining Shortened URL with Performance and scalability is important,Thats why Google gives us API platform where we could Read,Create,Analyse the Shortened URL by them.we are Just using the service provided by Google in rightful way by providing access Tokens , Login.


    Working With Google URL Shortener Service API and Create,Track,Maintain Analytics with Google Account - Javascript API
    google URL shortner API service
    Files   :  Download   |  Live Demo 

    Scope : 

    I have Written a simple Web application that connect with your Google account and Can fetch Your all Shortened URLs,Analytics and create new URL and shorten them within an instance.

    Installation and Requirements : 

    First of All Log into your Google Developer Console for registering our API service and to get API KEY and for Oauth Login. Click here


  • Create a Project and move inside [*note :  I haven't enable Billing for using Cloud or API Service-be cautious while using those service]


  • Under APIs And Auth select API -> enable URL SHORTENER API  alone is enough.


  • Then Move to Credentials Tab.Create API public Key with suitable requirements.select Browser key.


  • API KEY set up
    Then Move To Create Client ID : 
    Application type : Web Application with Authorized javascript Domain Origins and Redirect URL.I have given Both as same Since it is Single page web app under index.php in my localhost
    Get your Corresponding API key from Public API and CLIENT ID for our Web application.

    we need two Scripts from google namely client.js and jquery for easy handling.


     <script src="https://apis.google.com/js/client.js"></script>
     <script src="https://ajax.googleapis.com/ajax/libs/jquery/1.8.2/jquery.min.js"></script>


    Initialize App with Login and Fetching Access Token :
          Juts use Client ID here and Load with gapi.auth.authorize( ) function to authorize our application with an Google account.


      var apiKey = "API _ KEY here";
     var clientId =  "CLIENT _ KEY _ HERE ";
       var scopes ="https://www.googleapis.com/auth/urlshortener";


    Authorize function :

    gapi.auth.authorize   - method just takes client id and scope for authenticating user and provides you access token with gapi.auth.gettoken()


      function auth() {
            var config = {
              'client_id': clientId,
              'scope': scopes
            };
            gapi.auth.authorize(config, function(data) {
              console.log('login complete');
              console.log(gapi.auth.getToken());
             if(data.access_token)
             { $("#login").hide();
                    $("#call").show();
              }
           });
          }


    Create A New Shortened URL : 

    Generally client.load is used initialize with three params namely : scope ,version ,and a call back function to execute.This is the general approach to call API and bring data inside your application for any type of API data pulling,updating service.
    gapi.client.urlshortener.url.insert - is the main function which request the server API for result data and operation.this function just passes the Long url parameter to create shortened URL in return as JSON object.
      
           function load() {
             gapi.client.setApiKey(apiKey);
             gapi.client.load('urlshortener', 'v1', create);
    }
        function create() {
        var url = $("#url").val();
      var request = gapi.client.urlshortener.url.insert({
        'resource': {'longUrl': url }
      });
      request.execute(function(response) {
             // success do something here with responded data
             console.log(response.id);
       });
    }


    Retrieveing Long URL by inputing Short URL : 

    By the same above method gapi.client.urlshortener.url.get is responsible for fetching the relative long URL.
      
           function loadforretrieve() {
             gapi.client.setApiKey(apiKey);
             gapi.client.load('urlshortener', 'v1',read);
    }
        function read() {
         var url = $("#url").val();
      var request = gapi.client.urlshortener.url.get({
        'resource': {'shortUrl': url }
      });
      request.execute(function(response) {
             // success do something here with responded data
             console.log(response);
        });
    }


    Retrieving USER ACCOUNT shortened URL and Analytics :

    Similarly By the two Methods  gapi.client.urlshortener.url.list( ); will list you all URL already shortened by particular logined user.
     gapi.client.urlshortener.url.list({"projection" : "FULL"}); will list you with analytics ,clicks with month,days basis have a look at the response on console after performing the action.
      
           function loadforuser() {
             gapi.client.setApiKey(apiKey);
             gapi.client.load('urlshortener', 'v1',userapi);
    }
        function userapi() {
         var url = $("#url").val();
      var request = gapi.client.urlshortener.url.list);
      request.execute(function(response) {
             // success do something here with responded data
             console.log(response);
        });
    }


    You can achieve this function calls simply by button inputs onclick events and you should do with logic since you have jquery for hiding login button after authentication and displaying input box to create.

    If you have any doubt just ask in comments/mail me s.shivasurya@gmail.com.if you can find any bugs comment below.Share is care.

    Saturday, 10 May 2014

    Login system v1.0 - i-visionblog

    you have been using Google,Facebook Twitter with login system with recaptcha and recover system to maintain and enable privacy for users.Recaptcha enables the user to slow down the too many login attempts on a login page.I have enables access tokens to handle only genuine request from the genuine forms from PHP.since i got too many response on my last post Simple login system and OOPS approach i had made this in github for everyone to notify errors and optimize the script.

    login system v1.0 i-visionblog.com


     App structure:
      |
      |-------- css
      |               |------- bootstrap.min.css
      |               |------- bootstrap.css
      |               |------- validator
      |                              |---css
      |                              |       | --- bootstrapvalidator.css
      |                              |       | --- bootstrapvalidator.min.css
      |                              |----js
      |                                      | --- bootstrapValidator.js
      |                                      | --- bootstrapValidator.min.js
      |
      |--------- js
      |               | --- bootstrap.js
      |               | --- bootstrap.min.js
      |               | --- jquery.js
      |               | --- jquery.min.js
      |
      |--------- fonts
      |                | - normal font files from bootstrap
      |
      |--------- index.php //checks for session and create forms accordingly
      |
      |--------- home.php //checks for session and shows the data of login user
      |
      |--------- login.php //to check db,session,login access token,attempts,recaptcha
      |
      |--------- logout.php //check for session and access key for session destroy
      |
      |--------- recaptchalib.php //script from google to show recaptcha form and verfiy
      |
      |--------- user.sql //populate your database with this file using import


    features:

    1)bootstrap validation with framework

    2)complete login/logout with fixed sessions

    3)pdo queries from db (to avoid sql injection/hacks  )

    4)functions to check sessions

    5)hope this will work like facebook logout enabled with session and access tokens

    6)recaptcha from google to prevent more than 4 login attempts

    7)no cross site post attempts(hope :p )

    p.s report for bugs!! or open issues on github repo
    i will be giving constant updates & social media syncing with access tokens settings for sharing,commenting and other stories on facebook,twitter.share is care

    Sunday, 4 May 2014

    Setting up virtual host in local server in XAMPP for simultaneous projects

    virtual hosting is method of hosting on a single server with different domain name [your website address].It is also popularly known for shared hostings in web hosting industry.Mean while they handle too many techniques to handle request and on single server or set of connected ones,sharing mean here memory storage,processor cycles and many factors here are shared by many users those who host websites.i don't like shared web hosting but it is cheap and free to use for demos/test sites on original servers.i always recommend you for separate cloud/dedicated server or paid hosting server can be reliable for apps and business based websites which makes money! ;)


    so i would like to explain setting virtual host on XAMPP locally on windows platform.

    1) you have installed XAMPP server on your machine. or just download from official site and run the msi file.
    2) first let us go through httpd-vhost.conf file entries

        go to C:\xampp\apache\conf\extra

    3) we need to add some entries in httpd-vhost.conf file .better open it notepad or your favorite editor

    add the follow codings at bottom of your file.(back your file and work)

    NameVirtualHost *:80
    <VirtualHost *:80>
    DocumentRoot "C:/xampp/htdocs"
    ServerName localhost
    </VirtualHost>

    and in the same file add code to customize your virtual host

    <VirtualHost *:80>
    DocumentRoot "C:/xampp/htdocs/router/*within this you can point valid directory */
    ServerName test.dev
    ServerAlias www.test.dev
    <Directory "c:/xampp/htdocs/router"> /* within this you can point valid directory */
    Order allow,deny
    Allow from all
    </Directory>
    </VirtualHost>

    please remove comments from above coding.
    save it and go to host file in windows C:/Windows/System32/drivers/etc/hosts
    now open the notepad with Administrative rights to change the host file.an add the entry in it,add as last file entry.
    127.0.0.1             www.test.dev

    and save the file!!
    4) restart your web server httpd service in your laptop/pc. you must get like this below here.
    check out my url and it is my index.php

    5) thats fine now you can access it from new url with your local websever given in host files.

    though it is common tutorial here.it is valuable because when we work on different project this come handy and i was very sad to use same directory when i didnt approach this technique.share is care.report bugs as comments.dont play with host files better work with back up!.

    Wednesday, 23 April 2014

    Mobile Detect in PHP and categorize different OS and Devices

    According to +Mashable,Most of the Users nowadays use mobile phones,gadgets etc to access internet,apps and other services from them.so,it becomes handy for users and inorder to bring websites,standalone web application running in web browsers can be designed for the gadgets size and respective width and display the content appropriately for Easy access and better usage.You would have seen many site such as Google,Facebook release apps to load data for small gadgets efficiently instead of huge website with plugins.I would discuss about building apps from basic in future.in php we could detect the browser from headers and respond them accordingly!

    php Mobile detection


    Download the Above Mobile_detect.php and just call it by require or include function.

    Installation:

    <?php
    include("Mobile_detect.php");
    $found= new Mobile_detect;
    ?>

    Sample code:

    this code is just for sample there are lot of phones,OS,Browsers defined in Mobile_Detect.php just go through the class and call from creating object outside with appropriate spellings.


    Screenshot from I-OS:

    1)i have personally tested on Android,I-OS,Nokia ASHA and other web browsers.

    2)generally this tutorials is very easy and there are lot of classes to check the mobile detection.

    3)As far this class detect with the help of headers which carry browser information and OS.The authors of this class has took effort in finding Model Number|OS|Browser|Nature of Request and other parameters and made a simple class file for php.

    As developer you must be known Browser header carry info about OS,Browser info and other variables within them to serve pages from web server.


    a small snap of Request Headers.

    report for doubts and bugs in comments.share is care.and you must not ask if user hide ip address and Browser information to me :p

    Friday, 21 March 2014

    Load image url and choose like Google photos using php & jquery

    we would be fascinated by using Google to upload photos while mean time we could grab the image by using JQuery and with some inbuilt functions in PHP.I have given a simple script to load the image from the given url and handled some Error occurings with the help of inbuilt functions.Any way You must need minimum PHP version to test this sample because the built in function i have used must have 5.3.2 version minimum as per Docs of PHP.

    A final capture from my localhost to grab image from url!
    have a look at my code at codepen widget!
    <script type="text/javascript" src="http://ajax.googleapis.com/ajax/libs/jquery/1.4.2/jquery.min.js"></script>
    <script type="text/javascript">
    $(document).ready(function()
    {
    $("#contentbox").keyup(function()
    {
    var content=$(this).val();
    var urlRegex = /(\b(https?|ftp|file):\/\/[-A-Z0-9+&@#\/%?=~_|!:,.;]*[-A-Z0-9+&@#\/%=~_|])/ig;

    var url= content.match(urlRegex);

    if(url.length>0)
    {
    $("#flash").html('<img src="http://www.llandudnohostel.co.uk/assets/images/ajax-loader.gif">');
    $("#linkbox").slideDown('show');
    $.get("i.php?url="+url,function(data)
    {
    var expression=/https?:\/\/(www\.)?[-a-zA-Z0-9@:%._\+~#=]{2,256}\.[a-z]{2,6}\b([-a-zA-Z0-9@:%_\+.~#?&//=]*)/gi;
    var regex = new RegExp(expression);
    var t = data;
    if (t.match(regex) )
    {
    document.getElementById("linkbox").innerHTML = '';
    $("#linkbox").html("<img src='"+data+"' class='img'/>");
    }
    else
    {
    $("#linkbox").html("<h3><span class=\"error\">"+data+"</span></h3>");
    }
    });
    }
    else
    { $("#flash").html('<span>Enter valid url !okay?! </span>');
    }
    return false;
    });
    });
    </script>
    See the Pen grab image using url by s.shivasurya (@shivasurya) on CodePen.


    php code:

    This php code uses get parameter url and undergoes many test to check errors and atlast prints the url which is parsed with JQuery and displayed on clients page.

    <?php
    if($_GET['url']) {
    $shiva=$_GET['url'];
      if($info = new SplFileInfo($shiva)) {
         if($s=$info->getExtension()) {
            $allowedExts = array("gif", "jpeg", "jpg", "png");
              if(in_array($s, $allowedExts)) {
                 $size=getimagesize($shiva);
                   if($size && $size!=0 ) {
                      $img = $_GET['url'];
                        echo $img;
                    } else{echo "size error";}
                } else{echo "existence array error";}
          }else{echo "extension error";}
       }else{echo "file error";}
    }
    else{echo "error";}
    ?>

    Since i'm currently using free hosting and it is not above 5.3.2 version  :D sorry i couldn't provide however i tried in my Localhost !if u get any error just mail me or comment below.share is care. 

    Saturday, 15 March 2014

    creating facebook custom stories for facebook application - learn more @i-visionblog.com

    we would be fascinated in viewing the status updates,photo updates and as well as many actions that are taking place inside the Facebook.using facebook application we could create custom stories and could be posted inside facebook using such custom stories.Recently i was amazed while using Pintrest and their posts on facebook activity named as pinning action on their wall.This lead me to learn more about Graph API. and posting custom story creation.I was wandering around google for tutorials but facebook developers & stackoverflow gave me brilliant docs to follow and build the custom-stories for facebook application.


    creating facebook custom stories for facebook application - learn more @i-visionblog.com

    procedure:
    first of all for all developers must register in the developer about their new app for any platform provided facebook.it may either windows,android,facebook app,website application,i-os application or it may be a game running on facebook canvas.register with correct URL, domain name, and provide with Developer e-mail.

    1)Now go to Graph API side tab listed in left column and click that link.
    2)You will be showing with Create new stories (custom).


    3)Define new story with action and object.
    let us see some terms about action and object below.

    action: 

    action is something you do on facebook and represent the post and provide a view to the friends and you as post in timeline as well as news-feed. For example SHARE is action made by the user and they are represented as post in timeline and we could post in friends timeline.

    object:

    object is something which is shared,added or done something on facebook.They are things and important part of the post.We could define our own objects for our custom stories on facebook.for example we could take pintrest application where PIN is action and and post is the object which is important part of the representing data!

    my example :

    i have choosen Answer as object and Find as action .I have attended many online forum treasure hunt were we could login using facebook and they could post on our timeline after finishing each round!So lets now define a feed that can improve representation of post using custom stories and could create lot of user interaction.


    simple custom story from my application!

    Working with Graph API Explorer(debugger):

    now to check the post with the help of GRAPH API EXPLORER.just click on the GET CODE in stories and it shows variety of options such as Create,update,delete,retrieve for platform such as Http,PHP SDK,Android,I-OS and javascript SDK.

    1) select the HTTP platform and click on the Address given it leads to open the Graph Api explorer where we could debug the url and recieve data from Facebook server using Graph API.try the other platforms also!(i have not yet tried on android/i-os)

    2) Just submit the url with POST method and important thing here is me/{APP_Namespace}:{story_action} where we are going to apply the post to our timeline activity.After submiting we could see numeric value on click it we could see the post details.

    now visit your timeline ->Activity log you may find your activity as sample data and it doesnt goes live to the friends until the custom story is approved by facebook team! for the application you have created.

    additional options to provide users to add message,tags,places etc while posting custom stories so enable it in Action centre at below.
    options under action tab!


    submit your custom story action for review:

    under status and review option you must submit the custom story with lot of restriction made by facebook since to enhance the quality of sharing on facebook and giving clear mind picture if the post produce by the third party apps on facebook that never correlates with native facebook applications and makes the user to experience the real life posts on facebook which are made by developer and could integrate their website with facebook for social traffic and support.

    1) click start submission!
    before that every developer must know the settings before applying for review in facebook. Each app on facebook must have a LOGO image and have a detailed description about the application for the users to know about your application.
    overcome this error by adding necessary details!

    2)you must have flow of data and working of your post with screen shot with minimum of 3 photos 
    3) a detailed description about working of your custom story details and working of applications and uses of it.
    4)once again submit 4 different types of snapshot of your post on facebook that are made using platforms!
    5)and then submit for review and be free and have a cup of coffee aside.after three days facebook team approaches you about your status and describes what to be done.

    assume that if they have given authorization then you can configure your application properly and then work with graph API calls to update in Facebook.there are lot of rules and regulations using custom stories via graph api login !I will explain how to work after getting authorization for custom stories in my next post!

    if you could find errors!report the bug as comments or mail me! share is care!