Showing posts with label review. Show all posts

Friday, 8 July 2016

P0 Android Basics - Udacity Android Nanodegree Recap and Review

Udacity with Google has done excellent job in delivering standard and updated courses via Udacity android development courses with variety of categories such as Games,Beginners,Building App with Google API's and even more.They are also about to provide Associate Android Developer certificates by taking few test as projects over online as announced in Google I/O 2016.Me and My friends +venkat raman , Ajay are in track with Android Nanodegree course and projects.The course objective is to master basic Android concepts and adapt to future changes in design,coding style and updates.I'll try to reproduce the concept i learnt and applied during the project and passed reviews in this post.


Project Repo : Link

Process & Concepts :

The first project was just to build a mere Android app with specified layout,buttons and Onclick listeners implementations.(you can check my code).The goal was to ensure that users are able to work with Android studio and produce results from those by running it in emulator or phone.Luckily I have latest Android Smartphone with latest updates from Google.(6.0.1).

What I've Concentrated ?

  • Making my Java code readable one :D 
  • Concentrating on strings.xml file organising and not hard coding it.
    Though it was tough in beginning when you move forward and app grows in many countries and your user may expect in different languages,this technique will be scalable approach and managing it in one place.
  • writing reusable code in java - link
  • Few patient in testing in emulator,device.
Accomplishment of P0 - udacity android nanodegree


The next part was basics of Android such as components,form factors and do's and don't in the development process.with those installation and Android jargon such as Android API levels and Numbers,SDK levels,Compile version,Minimum and maximum SDK target levels and few more publishing techniques too.

Next Video Lectures :

The first section video consist of Android Studio tutorials,drag and drop widget tutorials and connecting the xml design file with java code and maintaining their lifecycle,connecting the app to the cloud with network code(http) and few views such ListView to handle huge amount of homogeneous data types.This leads to next level project as Popular Movies app by consuming themoviedb.org API to display popular movies running in nearby theatres.Mean while check out my Github repo and try practising it. 

Results : 

That's it and i've passed the project 0 with flying colours within a hour of starting the course :D with my friends +venkat raman and ajay.

Subscribe the blog for next upcoming recap and reviews.chat with me in G+/fb.for more discussion just leave a comment below.Thanks for reading.share is care.


Wednesday, 1 October 2014

Working With Apiary.io - Create RESTful WebService Documentation Much Easier

Creating RESTful WebService Doesn't matters here.It matters about how you Provide Documentation for your Users/Developers to consume your web service in Rightful manner.You Need to Create Your Best out of for Documentation and clearly explain with some kind of Demo or Else Developers may seek through Stackoverflow and other forums to resolve their Problem and May hinder development of Apps.apiary.io provides default doc for every API project you create.

Learn Here to create RESTful Webservice using Node.js/Mongoose dB

Working With Apiary.io - Create RESTful WebService Documentation Much Easier


Getting Started :  Visit Demo

Create an Account at apiary.io website and create a Domain in your favour and you can find sample coding for notes API.
Either you can simply Edit that API content and implement yours or else just follow below ideas/procedures to build a Successful API Documentation.

Host and Version For API :


 FORMAT: 1A

 HOST: http://api.example.com/


Name your API with Short Description:


 # Film API
 Film API Web Service Done with Help of Node.js as Backend.


Create a group :


 # Group film
 This Route film can get recent films and post new films


Categorize Your API Routes :


 ## film Routes [/films]


This will automatically create as /film below for each route you define.

Define Each of Your Route :

Here indentation is more important to overcome Symantic Errors.Either 8 Space bar or two Tab key press.


 ### List popular film [GET]
 + Response 200 (application/json)

        [{
          "id": 1, "title": "Neethane En Ponvasantham","genre":"love"
        }, {
          "id": 2, "title": "Moonu - 3 Film","genre":love"

        }]


Actually above Hash(#) must be thrice for defining completely your route with a Name of the route with REQUEST TYPE in SQUARE BRACKET.

Next Step define your Response with HTTP Status code and with return type of Response.
and With Enter key followed with Two tab spaces start typing example results from server

POST request : 


 ### Create a film [POST]
 + Request (application/json)

        { "title": "Yaan","genre":"action" }

 + Response 201 (application/json)


        { "id": 3, "title": "Yaan","genre":"action" }


Routes With Parameters :

Generally Parameters are passed via URL(Actually here URI) to make a GET/DELETE/PUT request.you must clearly specify the Data type and purpose of Parameters to be passed and gain expected data.

Define A specific Routes to categorize since the same uri can be used for GET , POST , PUT.


 ## Film By ID [/film/{id}]
 A single Film Details is performed here

 + Parameters
     + id (required, number, `1`) ... Numeric `id` is unique value given to the Each Film.


As like before follow the indentation here too.Either 8 spaces/two tabs.

Define Each Route Below.


### Retrieve a film  [GET]
+ Response 200 (application/json)

    + Header

            X-My-Header: The Value

    + Body

            { "id": 2, "title": "Neethane En Ponvasantham","genre":"love" }

### Remove a film [DELETE]
+ Response 204


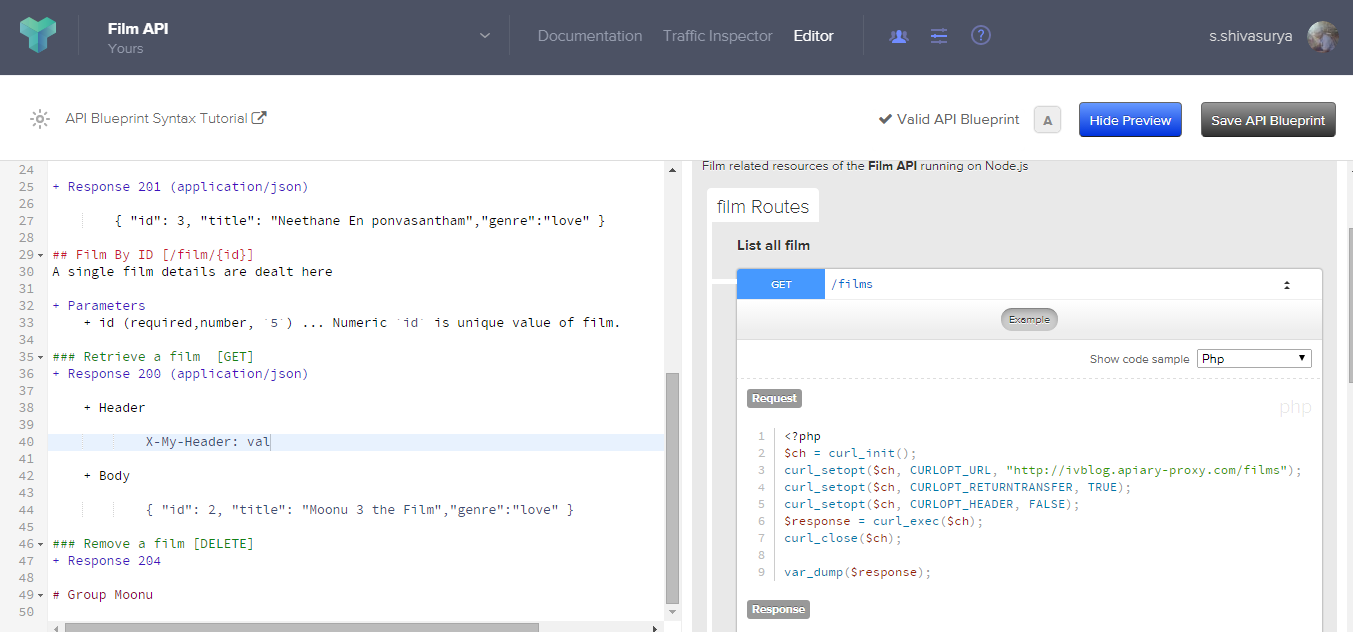
Thus We have Define a Successful doc for our Successful API with Apiary.io,Just preview with Apiary and make changes.

Have a look at my Simple Film API snapshot : visit for full Demo here

Working With Apiary.io - Create RESTful WebService Documentation Much Easier


The Above Screenshot of My API service for film API.

Caution : 
Don't Follow above Example codes,those are not formatted with tabs/Spaces
The Sample will be working only if you add correct host,and make sure of CORS policy of Ajax to run sample properly.Indentation for Response,Request is more important.Either(8 spaces/2 Tabs).

For bugs/comments/suggestions/errors comment below or mail me s.shivasurya@gmail.com or connect with me in Facebook/Twitter.Feel free to comment below.Share is care.

Saturday, 13 September 2014

Getting Started With Ionic App - Android Application

Nowadays peoples get fascinated by using apps and even my friends review many apps from play store and share their experience with their besties :D . And recently i have attended a workshop on Mobile apps development and already working with ionic apps development.However there are lot of pitfalls in using html5 with phonegap while writing for native.The only thing is easy way to code and organize front end with backend.

Getting Started With Ionic App - Android Application


Installation :  

installing ionic in your system is very easy if you have node.js installed already and integrate it with Eclipse or any other ADT supported studio with plugins.

C:\> npm install -g ionic

Learn here to install node.js and using Eclipse IDE For android development.

Configuring on Windows :

Well i don't want to write too much of configuring steps here.all is simple short list goes below
  1. you must have installed Java and accessible Via commandline(javac and java)
  2. You must have installed ANT and accessible via commandline i.e simply specify the path till ant folder create as variable ANT_HOME
  3. You must have installed eclipse IDE(i had juno) with ADT updated with Android SDK and active emulators.
  4. now once again create ENV variable ANDROID_HOME specify the path till sdk folder
  5. Create three path variable with semicolon as terminator
    %ANT_HOME%\bin;
    %ANDROID_HOME%\tools;
    %ANDROID_HOME%\platform-tools;
Make sure everything works fine via CLI.However,this is common for both Windows/Linux.If you cant traces out wrong,similar doubts are answered in Stackoverflow forum.

Creating your first App : 

create a new directory and move into it using command prompt.here we are just creating a basic app and testing it locally on emulator installing the apk file into emulator from our ionic project.

  • C:\>ionic start demoapp tabs
    this creates demoapp folder with tabs app (previously demo files from ionic)
  • C:\>cd demoapp
  • C:\demoapp> ionic platform add android
    here we just add necessary build files for specific platform,since we are doing for android add key word android.This adds necessary bin,src config source files.
  • C:\demoapp>ionic build android
    just we are going to compile android application and create apk file from our source files.
  • C:\demoapp>ionic emulate android
    and finally this is gonna create a AVD(emulators) installing the apk file and launching the current activity on screen.
  • C:\demoapp>ionic run android
    and you can install it into android mobile if you have USB debuggin connected with internal/SD card storage under developer options in android os.
If all above steps consequently works ,then u may get compiled and ready to install the app.if any errors occurs in between,it may be fault in your path setting/installation.

Errors are going to be in Node.js exception format.you can track the errors and clear it with Stackoverflow website.

Screenshots :

Create a Demoapp folder.


Ionic start demoapp tabs command just download the starter template from github account and loads into the folder for you.


ionic platform add android : creates necessary build files for android project with java files and cardova plugins.

ionic build android : compiles the source and create necessary build files for android platform and dependencies


ionic emulate android : just creates avd for you and install apk file into the emulator and launches the main activity.


ionic run android : just deploy the android application directly into your android mobile while connecting with USB , With Unknown Source apps and USB debugging connected.look at screenshot below app on emulator.


Android Sample App running active device with installed app.


Download Demo files/install and work with project.However there are lot of disadvantages in hybrid app development.Your source codes are revealed when the apk file is decompiled :D in production.


For errors/bugs/suggestion comment below or mail me s.shivasurya@gmail.com or connect with me in Facebook/Twitter/Linkedin.Share is care.

Monday, 18 August 2014

Run Android Apps on PC Desktop with Windroy - i-visionblog by @nancy.joslin

We have many software like BlueStacks ,youwave,genemotion,andy to run android apps on pc. We can also use another emulator - WINDROY. It is a freeware android running with windows. It is the easiest and fasted way to run all android apps and games including 3D games on your pc along with windows.The present version is android 4.0.3 and new versions are being developed.Note that if you have Eclipse installed in your system you can run any type of Android OS with emulator from Google and with custom settings from your preferred companies like samsung,SONY too.


Scope :

This Article Enables you to run Android application on Windows Desktop [PC]

Specifications : 
It provides
  • ·         Android version 4.0.3.
  • ·         Runs on windows vista, 7, and 8.
  • ·         Supports any UI resolution.
  • ·         Supports Ethernet and PPPoE (Point-to-Point Protocol over Ethernet). 
  • ·         Gives the user the original experience of android device.
  • ·         Input devices are mouse and keyboard so easy to work with.

You can download Windroy from this link 
Install it.
Then open, you will one like this on your pc, starting may take several minutes.

Check the android version in settings>About phone.
Then check mark the ‘unknown sources’ in security >device administration.


To open android app, use one of the following methods. 
      
  • Go to the windroy location on your pc then open windroy_root>system>app Copy and paste your apk file then restart windroy from the beginning you will find your apk on that screen.
  • Go to the windroy location ,then open windroy_root>data>app.Then do the same as did before for first method.       

If this both didn’t work download android market such as mobogenie in windroy. Search your favorite app then download it and install. Now your app can be opened without any conflicts. Google play cannot be used.

Now go test all your android apps on your pc itself.Enjoy apps on PC!

Author :
Nancy Joslin , INDIA studies Computer Science engineering and loves to write technical articles on Android, and other amazing emerging technologies in i-visionblog.

Feel free to comment below to point out errors/bugs/experience.Willing to write posts in our blog join with us - contact me - s.shivasurya@gmail.com and connect with Fb/Twitter

Note that try this on your own risk on your pc,using android emulators on windows with caution.i-visionblog is no way responsible for damages by software.here by we just promote and introduce features that we had run for test purpose in our systems for development.

Wednesday, 13 August 2014

Deploy Node.js Application on Openshift Hybrid Cloud - i-visionblog

Nowadays Developers/End users prefer cloud services for their Usage,Storage and Demanding service in one clicks either using credit cards for paying the usage.Business start ups / Developers prefer to host their applications on cloud public for users access, and to manage a huge data ,analyse by powerful cloud machines provided by cloud service providers.Where Business peoples/Developers and others can forget their Hardware specifications and start involving in the Application designs and management.Cloud plays important part in business side data/analytics handling!


Deploy Node.js Application on Openshift Hybrid Cloud - i-visionblog

Article About Cloud at i-visionblog : 

  1. What is Cloud Computing ?  - A Good Explanation for Easy Understanding with Video.
  2. Deploy PHP application - Heroku Cloud [ free untill you add add-ons]
  3. Deploy PHP application+IBM Bluemix Cloud [free trial Period ]
  4. Deploy Node.js Application+IBM Bluemix Cloud Foundry
  5. Deploy Mobile Application DataStore online - Parse.com [ Free for Personal apps ]

Scope : 

Here You can develop a simple Node.js Application at Localhost and make it as deployable at Openshift(Red Hat) .

Installation : (Windows Machine ) :

  • Download GIT command line and make sure accessible via command Line [ git --version  must output with version number] click here to download.
  • Download Ruby Installer [ Stable version ] from here Must be accessible via command line.
  • once all goes well do  C:\> gem install rhc  Must Install you with RHC Client for windows.
  • Go to Red Hat Openshift Website and create a Account & then  Create a Domain name.  
This is Enough to Deploy your app in minutes from desktop.however Mac,Linux others can follow deploy process which is same since Git is Standard.Installation can differ.

RHC Setup :

 C:\ >  rhc setup 

It may prompt you for Adding server host ! Just Skip it by Pressing Enter key.you can add it later too.
Then It may ask you to login with openshift account online emailID and Password in CMD if you're doing it first time.
And allow to add a Private SSH file for authentication purpose - RSA public key adding it permanently on you command line for 30 days life time.Enter "yes" to accept and proceed.

Creating Application :

 I would Generally appreciate you to Go to Openshift website to have Overview of application present.
There are lot of application present to be installed.
  • Add Node.js Application by clicking add application
  • Name your application [ Note that you must have added Domain Name already after sign up ]
  • And Add a custom Url for your application - [ can be changed if you have DNS records ]
  • Git repo is optional here 
  • If you want to scale application for more users,Do load balancing here- [note if you have database in application make sure it is shared across application on different instance shares it]
  • Create Application and Get the Source url starting with SSH:// on console application page
Adding Source :
adding source to application !
  • C:\ > git clone [copy the SSH:// URL here ]
  • This would initialize your application directory for Deploying.
  • Copy your Application Folders/Files with package.json and server.js [server.js name is mandatory to start your application ]
Changes in server.js:

Your Localhost is not equivalent to Cloud Setup so, you must provide ip and Port variable to run your application on cloud.And make sure port,ip should be same as Below for any type of Node.js 

var port = process.env.OPENSHIFT_NODEJS_PORT || 8080;
var ip = process.env.OPENSHIFT_NODEJS_IP || "127.0.0.1";

and At last while making the application to listen to given port,ip

server.listen(port,ip);

A sample of Server.js file :


Thats All just move in to your Directory through Command Prompt .execute three commands succesive manner and deploy your application.For updating application just follow these three commands one by one.

  • C:\ > git add .
  • C:\> git commit -am "initial commit"
  • C:\> git push origin master 
Debug & Logs :

  • just type  C:\> rhc tail <app_name>
will provide you ongoing Requests / Errors in the Node Applications .

Thus we have Successfully Deployed First Node.js Application on Openshift Hybrid Cloud.Openshift is Free to have Three application with Scalable Application , Https Connection access and also more add-ons With Limited three Gears each Application & 1 GB space.Have a try ! be cautious before adding Credit cards because it may cost you for overusage!.

Report for Error/Suggestions as Comments or mail me s.shivasurya@gmail.com / or connect with me in Facebook/Twitter.Enjoyed the Posts,Share is care and Do comments!

Saturday, 26 July 2014

Getting Started With Node WebKit Apps- Developing Desktop Native Apps

HTML5 Becomes Day to day More Powerful since it supports many Developer Friendly API such as Audio,File,Geolocations and many too.Html5 was used to build Amazing websites,Phonegap Apps for Android,iOS,Windows and Bada OS too.Now it has been started to be used as Desktop Application with HTML5 API and Javascript API native Windows Tasks with the help of Node.js Modules.Having Experience on Node.js Previously I am Writing this Article - Read More about Node.js Basic Here.Even Intel Appframwork GUI based mobile application developing environment uses nodewebkit as a part!


Reference : Download Demo File

Installation :

Just visit the GitHub Project use their Download option and extract the file and keep it in directory where you frequently access.

Project structure :

|-www
|  |_ index.html
|-node_modules [ if necessary ] 
|-package.json
|-ico.png


package.json :


index.html:

consider Demo file for working purpose.

Creating Zip File : 


1) Create New-> Zip File 

2) Add all www,package.json and ico.png file to Zip files and rename name.nw.zip
3) go to nodewebkit folder where you have extracted and copy this Zip file .
4) open in command prompt[terminal].
5)move to extracted Folder which you have Downloaded and execute the command.

C:\node > nw nameofapp.nw.zip


This opens the nodewebkit app index.html with your specified app details using package.json file such as toolbars,height,width and etc.


Create executable binary for Distribution:


under same directory run the command in the command prompt


copy /b nw.exe+appname.nw.zip application.exe


Note:
For More Desktop API window environment Visit official Github Repo Wiki to learn more.Consider npm repository searches for creating node_modules under nodewebkit app for node.js support. 

If any error/bug in the Demo/Article Just Mail me s.shivasurya@gmail.com or comment below here.or connect wit me via Facebook/Twitter for interactions.Share is care. 

Thursday, 26 June 2014

Working With Parse.com For Mobile Application Data Storage - Javascript API Connecting NoSql Datastore

Nowadays we are always tempt to use mobile applications on Android/iOS/ BBos and Windows 8 and etc...where these apps have to store the data for future reference.Particularly concentrating HTML5 apps powered by javascripts are more powerful and easy to build across different platforms.The User data is better to store in cloud and could be searched with the help of API provided.although Parse stands Easy for me for saving data,Where Bluemix Also supports that ,I have tried Parse since it gives Class-Object approach to save data with few lines of Javascript code.And Application can be easily scalable and Searched efficiently.Not Only mobile applications,Apps that is data-driven can also use this feature for easy storage and tension free and forget about Database design,Support and code for connecting database.Where parse provides simply efficient datastore with Access Tokens and Application ID and save your data.And it is also part of Facebook :)

Working With Parse.com For Mobile Application Data Storage - Javascript API Connecting NoSql Datastore
parse.com - i-visionblog - Mobile apps Storage

Scope:

This Post can Give you a Experience to store data as Objects via Class using Javascript API provided by Parse.com.Not only Data, You could upload files and others too save in the Datastore,with few lines of Javascript Code and Application ID and Secret Code.

Installation :

As Like Normal Javascript include it in normal part and You can Download from Official Parse Site.click to Download

                  <script src="./parse-1.2.18.js"></script>

Understanding the Concept Of Saving Data : 

Storing data on Parse is built around Parse.Object. Each Parse.Object contains key-value pairs of JSON-compatible data. This data is schemaless, which means that you don't need to specify ahead of time what keys exist on each Parse.Object. You simply set whatever key-value pairs you want, and our backend will store it.
Create a Object by extending the Parse.Object.extend and this could create new class and then we could save as Keys must be alphanumeric strings. Values can be strings, numbers, booleans, or even arrays.

example for raw data :

                    email: "s.shivasurya@gmail.com", phone: 9788012345

JavaScript API to Handle Data :

I have Chosen JQuery to Handle my data and operation to perform with Parse javascript functions with callbacks,since it is basically network operation.

1) Create Application in Parse.com  and You may receive Application ID and Secret Keys for various platforms for your application.

Initialize Your Application to Connect Parse :
First Initiative step is to save the Data as objects with particular class in Parse.com.So,Create a Class in parse dashboard.

2) just use Parse.initialize method to configure your application and get connected to the Parse Datastore.

Parse.initialize("Your App ID", "Your Javascript Key");

CRUD functionality:

3) First let us see how to create a Row(Record) with unique object ID that contains User Data, and by default it has Created Time ,Updated Time with ACL(Access Control List).

To Create a record just extend the parse object with suitable created class and create object with that and invoke the function save to save our data in Datastore.Well see the example below.

   var createobject = Parse.Object.extend("users");
   var objectwithdata = new createobject();
   objectwithdata.save({email: email,phone: phonenumber},{
         success: function(object) {
         console.log("success");
         $("#load").hide();
         },
        error: function(model, error) {
         console.log("error");
           }
    });

In above code we have just extended to class user and created object of User class.and we have added few data by invoking a function save() with a callback function with success and Error handlers.since it is time consuming operation to save data in parse.so whenever the return is success a row is added automatically with Object ID ,it is better to retrieve and keep it in HTML5 storage for later queries and other operations.

Retrieve Data : 


   var retreiveobject = Parse.Object.extend("users");
   var retrievedata = new retreiveobject();
   retrievedata.get("Your Object ID for Particular Client",{
         success: function(object) {
         console.log("success");
         console.log(object);
         },
        error: function(model, error) {
         console.log("error");
           }
    });

In above code we have just extended to class user and created object of User class.and we have read few data by invoking a function get() with a callback function with success and Error handlers.

Update Data :


   var retreiveobject = Parse.Object.extend("users");
   var retrievedata = new retreiveobject();
   retrievedata.get("Your Object ID for Particular Client",{
         success: function(object) {
         console.log("success");
         console.log(object);
         retrievedata.set("email","suriya1180@gmail.com");
         retrievedata.set("phonenumber",9876543210);
         retrievedata.save();
         },
        error: function(model, error) {
         console.log("error");
           }
    });

In the above method we had retrieved the data and we just used set() function to update values and finally call save() function to update the data in database.

Delete Object :

   var destroyclass = Parse.Object.extend("users");
   var destroyobject = new destroyclass();
   destroyobject.destroy("Your Object ID for Particular Client",{
         success: function(object) {
         console.log("successfully deleted");
         },
        error: function(model,error) {
         console.log("error");
           }
    });

In the above method we have just called the destroy() function to destroy the row of particular Object ID from Datastore.
There are still Lot arrays,Datatypes,queries,compound query,relating data and so on.visit here to Learn more

My sample :

I have created a class named users with phone numbers and email storing data in parse and when success function runs it is redirected to List.html file in my mobile application.

       //consider jquery.js included
     <script src="js/parse-1.2.18.js"></script>
     <script>
   
        $(document).ready(function(){
   
        $("#login").click(function()
            {
                var email=$("#email").val();
                var phonenumber=$("#phonenumber").val();
                console.log(email);
                console.log(phonenumber);
                $("#search").hide();
                $("#load").show();
                Parse.initialize("My APP ID", "My javascript Secret Key");
                var TestObject = Parse.Object.extend("users");
                var testObject = new TestObject();
                testObject.save({email: email,phone:phonenumber},{
                  success: function(object) {
                   console.log("success");
                  $("#load").hide();
                   window.location="./list.html";
                },
                error: function(model, error) {
                console.log("error");
      }
});        
 }
        );
            });
    </script>


My simulated application results:

I had made a simple form to trigger with sign up button and call parse.save function to save data in Datastore.

Cautions:

1)Always concentrate Errors on Console Log of chrome to minimize the Errors

2)However it is javascript client code it is showing both keys public manner.so just use ACL and permissions,Sessions to prevent Illegal data transactions in Parse Dashboard.

3)Handle the Errors and print the errors to guide the project to success.


My result:

my Class with Data populated on Parse.

Beware of Securing the Data.Just Try out Parse for Mobile apps and make use of Cloud code for efficient scaling.For further doubts/Bugs/reports Mail me s.shivasurya@gmail.com or let us disqus as comment below.Share is care

Thursday, 29 May 2014

Working with impress.js to create presentations using HTML & CSS3 - impress.js

Impress.js was awesome plugin to create awesome presentation because it uses HTML and CSS3 to animate and make the presentation still more lively for users.at the sametime the Author of impress.js warns about the usage of the presentation will be nice only if it is interesting and it's not suitable for the official meets presentations.however it is easy to set up the plugin environment and start our presentation slides.I hope it works only on modern browsers.i have already used Fathom.js but it was regular for official purpose but this one is quite interesting to display interesting streams.
preview img from presentation slide impress.js


Browser compatibility: 

Currently impress.js works fine in latest Chrome/Chromium browser, Safari 5.1 and Firefox 10. With addition of some HTML5 polyfills (see below for details) it should work in Internet Explorer 10 (currently available as Developers Preview). It doesn't work in Opera, as it doesn't support CSS 3D transforms.As a presentation tool it was not developed with mobile browsers in mind, but some tablets are good enough to run it, so it should work quite well on iPad (iOS 5, or iOS 4 with HTML5 polyfills) and Blackberry Playbook.


Installation:

just like other javascript just include both impress.js and demo-impress.js in your html file in between <head></head> tags.get the orginal source from here.


<link href="/demo-css.css" rel="stylesheet" /> 
<script src="/impress.js" ></script>


Usage :

Lets start with normal Html tags below

<html lang="en">
    <head>
        <meta charset="utf-8" />
           <!-- your CSS and JS files can be included here. --> 
</head>

now lets dive into slides where i have made them in to div tags and mentioned them with classes and ID's.

check browser issues:

before that we must check the browser support if it supports then we could proceed normally! or else we must highlight by showing them Error message and try in latest browsers.

<div id="impress" class="impress-not-supported">

    <div class="fallback-message"> <!-- this fallback message shows when issues exist -->
        <p>Your browser <b>doesn't support the features required</b> by impress.js, so you are presented with a simplified version of this presentation.</p>
        <p>For the best experience please use the latest <b>Chrome</b> or <b>Safari</b> browser. Firefox 10 (to be released soon) will also handle it.</p>
    </div> 

  <!-- your slides div can go here -->


</div> <!-- end of div class="impress-not-supported" -->


slides as div tag : 

before directly creating tags,just imagine a graph sheet in which you reference with X,Y,Z axis in which our div slides are going to be placed.our javascript plugin takes the value from div and moves around accordingly with CSS3.
it is mandatory to use Class step in each of our div slides.and you can mention other options if you want.

General Approach of Div slide:

<div class="step" data-x="Preferred_value" data-y="Preferred_value" data-z="Preferred_valuedata-rotate="Preferred_option" data-scale="Preferred_option">

  <!-- here you could use your own style of HTML coding for contents --> 

</div>


Example for Div slide:
options:
data-x : which moves along x-axis slide
data-y : which moves along y-axis slide
data-z : which moves along z-axis slide
data-rotate : which rotates around and reach your slide normally
data-scale : which scales above the slide(zoom level)

<div class="stepdata-x="200data-y="200data-z="100data-rotate="45data-scale="5">

  <!-- here you could use your own style of HTML coding for contents --> 
<p>welcome to i-visionblog.com</p>
<p>i love to create and share my ideas through my blog </p>
<p>i love to create web/mobile apps as a hobby and my interest is to work with Bigdata and analytics</p>

</div>


additional to this we could add some extra effects 3D with id="its-in-3d" and giving option to rotate in their axis 
data-rotate-x & data-rotate-y & data-rotate-z : which rotates when sliding on their axis corresponding, can be a 3D view.however it is simple and easy to code.


<div class="stepdata-rotate-x="200data-y="200data-z="100data-rotate="45data-scale="-5" id="its-in-3d">

  <!-- here you could use your own style of HTML coding for contents --> 
<p>it's a 3d view here..</p>

</div>

<!-- this is the last slide of the presentation mentioned with id="return" to go back to our first slide -->

<div id="return" class="step" data-rotate="0" data-y="2000" data-x="2000">
<p>join us ! code with us or create ideas | visit www.github.com/shivasurya</p>
    </div>

<!-- this can be hint for users to naviagte with spacebar or arrow keys -->

<div class="hint">
    <p>Use a spacebar or arrow keys to navigate</p>

</div>


contributors have added some audio and other specific functions go through them in Github official impress.js.if you can find more options and bugs in my demo/code comment below!

This can be more innovative and interesting when you can think logically using graphs.other can simply use the template provided.I have mentioned options which i have used in this presentation,if i had missed out or any bugs,comment and notify me via E-mail.share is care.